VG-21 Maintenance
Item # 15 15 January, 1995
NOSE
WHEEL SHIMMY: If you own a Varga, you have probably
experienced a nose wheel shimmy at some time. I think the most
The easiest way
to look for nose gear steering wear and tear is to have someone hold the tail
down while you turn the nose gear through it's travel
and check to see if everything is tight. You can also try to move the nose
wheel fore and aft and from side to side to see if the plastic bushings inside
the strut are still in good condition. If anything moves in the wrong direction
(up and down instead of fore and aft, for example) then you should take it off
and examine it's attachment holes and fasteners for
wear. Repair or replace any parts that need it. When you lubricate it and put
it back together, it's probably better to have just a little friction than
totally free movement.
Steering Yoke
Inspection and Repair: The Steering Yoke is kind of a special case. I haven't
seen one yet that didn't need to be shimmed a little. Making a shim isn't hard
(I usually cut up a beer or pop can) but you must remove the lower strut to
install it. This removal procedure is described in paragraph 6.4.1 of the
maintenance manual. Worn shimmy dampener, torque link and steering arm
attachment holes can usually be drilled oversize and bushed by you or your
repair shop.
Shimmy Dampener
Inspection and Repair: The shimmy dampener was not made to be disassembled, but
I finally figured out how to replace the push rod "0" rings which are
the most
• Before removing the shimmy dampener assembly,
check the rod end bearing, rod end bearing to yoke attachment bolt
and hole and the
cylinder attachment bolt and hole for excessive play. If the Spherco TRE-4 rod end bearing is
worn out,
get a new one. If the
NAS 1297-4D-12 shoulder bolt is worn, get a new one. If the attachment hole on
the shimmy
dampener is worn,
it will probably have to be taken to a shop and bushed and reamed to the proper
size.
• Remove the shimmy dampener from aircraft.
• Clean the dampener assembly thoroughly to
remove all dirt, grease and hydraulic fluid.
• Remove 12-24 x 1/4" filler screw (Don't
lose this screw, they are hard to find!) from dampener. Inspect the fiber
washer
for condition and
replace if necessary.
• Push the rod end bearing all the way in (as
close to dampener cylinder as it will go) and fill the cylinder
aircraft hydraulic
fluid. A large syringe with a large needle works very well for this. Make sure
all the air has been
removed. This may
require overfilling until all air bubbles stop
• Reinstall the filler screw and tighten.
• Wipe the dampener clean and dry of hydraulic
fluid.
• Move pushrod back and forth through it's full
stroke while inspecting to see IF and WHERE hydraulic fluid is leaking out.
Pushrod movement will be jerky or noisy if
there is still air in the dampener. If the dampener isn't jerky, noisy or
leaking,
put it back on the
airplane. If it is not leaking but is still noisy or jerky when you push the
rod back and forth, refill it until
ALL the air is gone. When the pushrod action
is smooth and quiet through it's full stroke put it
back on the airplane.
• If the dampener is leaking at the joint
between one of the end caps and the cylinder casting, you will probably need to
take it to a shop
and have the end cap pressed out so that the outer "0" ring can be
replaced. Unfortunately, removal of
the end cap can
sometimes score it and/or the cylinder wall so badly that it won't stay in
under pressure when
reinstalled. You
may have to repair or find or make new parts to fit if this happens. If you must remove an end cap,
make sure before
you reinstall it that the pushrod hole is also in good condition and the proper
inside diameter.
Worn Push Rod
Seals: If oil is only leaking from around the pushrod holes, the following
repair instructions to remove and replace the pushrod "0" ring seals
may work for you.
• Remove the oil filler screw and pump or drain
out all the fluid.
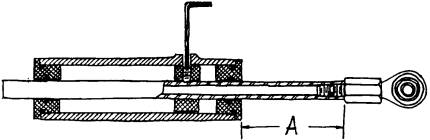
• Move the push rod until the rod end bearing
end of the push rod is about 3 1/2" from the center of the filler hole.
The
pushrod piston
should be visible in the filler hole. Rotate the pushrod in either direction
until the piston set screw is
visible and
centered in the filler hole. Install an alien wrench in the set screw through
the filler hole. Measure and write
down or remember
the EXACT distance of the rod end bearing to the end of the shimmy dampener
(dimension "A"). You
will need it for
proper reassembly.
• CAUTION! Before loosening the set screw
make sure there are no burrs or sharp edges on the unthreaded end of the
pushrod. lf there are, carefully clean them off with fine emery cloth
or a file or you will risk damaging the inside diameter
of the end caps or
piston when you remove the pushrod.
|
|
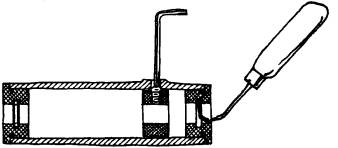
![]() Rotate the allen wrench counter clockwise and
back the set screw out until it gently but firmly contacts the inside of the
filler screw hole. This should hold the piston in place white you gently but
firmly tap the unthreaded end of the pushrod out with a 5/16" diameter
brass or aluminum rod. NOTE: You may wish to hold the alien wrench in the
setscrew hole to help keep the piston from moving out of place while tapping on
the pushrod.
Rotate the allen wrench counter clockwise and
back the set screw out until it gently but firmly contacts the inside of the
filler screw hole. This should hold the piston in place white you gently but
firmly tap the unthreaded end of the pushrod out with a 5/16" diameter
brass or aluminum rod. NOTE: You may wish to hold the alien wrench in the
setscrew hole to help keep the piston from moving out of place while tapping on
the pushrod.
![]() After the pushrod has been removed you will be able to see the
"O''rings by looking into the pushrod holes in
the cylinder end caps. Using a sharp needle-like tool, carefully remove the
"0" ring from its’ groove in the end cap. CAUTION: Be careful not to
scratch the bore in the end cap or to push the "0" ring into the
cylinder because it may be very hard to get out without removing an end cap.
After the pushrod has been removed you will be able to see the
"O''rings by looking into the pushrod holes in
the cylinder end caps. Using a sharp needle-like tool, carefully remove the
"0" ring from its’ groove in the end cap. CAUTION: Be careful not to
scratch the bore in the end cap or to push the "0" ring into the
cylinder because it may be very hard to get out without removing an end cap.
|
|
![]() After the "0" rings have been removed, inspect the end
cap pushrod holes for wear or damage and repair as required.
After the "0" rings have been removed, inspect the end
cap pushrod holes for wear or damage and repair as required.
![]() Inspect and clean the "0" ring groove and carefully
install a new "0" ring, again using CAUTION not to push the new
"0" ring too far past the groove and into the cylinder.
Inspect and clean the "0" ring groove and carefully
install a new "0" ring, again using CAUTION not to push the new
"0" ring too far past the groove and into the cylinder.
![]() Before reinstalling the pushrod, inspect the setscrew dimple and
the ends for burrs and/or sharp edges. Remove them with a file or fine emery
cloth as required. Any sharp edges left on the pushrod may cut the
"0" rings when the pushrod is reinstalled and cause premature
failure.
Before reinstalling the pushrod, inspect the setscrew dimple and
the ends for burrs and/or sharp edges. Remove them with a file or fine emery
cloth as required. Any sharp edges left on the pushrod may cut the
"0" rings when the pushrod is reinstalled and cause premature
failure.
![]() Lubricate the "0" rings with hydraulic fluid and
reinstall the pushrod opposite of removal.
Lubricate the "0" rings with hydraulic fluid and
reinstall the pushrod opposite of removal.
![]() Fill the cylinder with hydraulic fluid, check for leaks and smooth
operation and put the shimmy dampener back on the airplane.
Fill the cylinder with hydraulic fluid, check for leaks and smooth
operation and put the shimmy dampener back on the airplane.